Part 8. How to Secure Communication and Storage
Update, June 25, 2024: This blog post series is now also available as a book called Fundamentals of DevOps and Software Delivery: A hands-on guide to deploying and managing software in production, published by O’Reilly Media!
This is Part 8 of the Fundamentals of DevOps and Software Delivery series. In Part 7, you learned about the role networking plays in security, including the importance of private networks, bastion hosts, VPCs, and service meshes. But what happens if a malicious actor finds a way to intercept the data you transmit over the network? Or what if they manage to get access to that data when you write it to a hard drive? Networking provides one important layer of defense, but as you also saw in Part 7, you need multiple layers, so you’re never one mistake away from disaster (defense in depth). In this blog post, you’ll learn about two more layers of defense:
- Secure storage
-
Protect your data from unauthorized snooping or interference using encryption at rest, secrets management, password storage, and key management.
- Secure communication
-
Protect your communication over the network from unauthorized snooping or interference using encryption in transit and secure transport protocols.
As you go through these topics, this blog post will walk you through a number of hands-on examples, including how to encrypt data with AES and RSA, verify file integrity with SHA-256, HMAC, and digital signatures, store secrets in AWS Secrets Manager, and serve traffic over HTTPS using TLS certificates from Lets Encrypt. But first, let’s do a quick primer on what makes all of this possible: cryptography.
Cryptography Primer
Cryptography is the study of how to protect data from adversaries so as to provide three key benefits, which sometimes go by the acronym CIA:[33]
- Confidentiality
-
Keep your data secret, so only those you intend to see it can see it.
- Integrity
-
Ensure your data can’t be modified in any way by unauthorized parties.
- Authenticity
-
Ensure you are really communicating with the intended parties.
To achieve these benefits, modern cryptography combines multiple disciplines, including mathematics, computer science, and information security. It’s a fascinating topic, but also a highly complex one, and if you take away only one thing from this blog post, it should be this: do not invent your own cryptography (unless you have extensive training and experience in this discipline).
Anyone, from the most clueless amateur to the best cryptographer, can create an algorithm that he himself can’t break. It’s not even hard. What is hard is creating an algorithm that no one else can break, even after years of analysis.
Memo to the Amateur Cipher Designer
Cryptography isn’t like other software. With most software, you are dealing with users who are mildly engaged at best, and most bugs are minor. With cryptography, you are dealing with determined adversaries who are doing everything they can to defeat you, and where any bug found by any of these adversaries can be catastrophic. You may be able to outsmart some of them some of the time, but you probably won’t be able to outsmart all of them all of the time. Any scheme an amateur comes up with from scratch is almost certain to be vulnerable to one or more of the brilliant and devious cryptographic attacks (e.g., side-channel attacks, timing attacks, man-in-the-middle attacks, replay attacks, injection attacks) that clever people have come up with over the many centuries cryptography has been around.
If you ever want a glimpse into just how hard it is to get security right, sign up for security advisory mailing lists for the software you use. I watched these lists for years, and it was both terrifying and humbling to realize that it was a rare day when there wasn’t at least one serious vulnerability found in Windows, Linux, OpenSSL, PHP, Jenkins, WordPress, or other software we all rely on. In some ways, this is a good thing: all software has vulnerabilities, but it’s only from years of usage and attacks that those vulnerabilities are found and fixed. The same is true of cryptography: all cryptography has vulnerabilities, and it’s only after withstanding years of usage and attacks that you can consider it secure.
|
Key takeaway #1
Don’t roll your own cryptography. Always use mature, battle-tested, proven algorithms and implementations. |
Due to its complexity, a deep-dive on cryptography or the underlying mathematics is beyond the scope of this blog post series (see Chapter 8 recommended reading if you’re interested). My goal in this section is only to introduce, at a high level, two key concepts from cryptography:
-
Encryption
-
Hashing
I believe if you can get a grasp on what these are—and just as importantly, clear up the many misconceptions about them—that will be sufficient to allow you to make use of cryptography to handle the use cases covered later in this blog post (secure communications and storage). Let’s start by looking at encryption.
Encryption
Encryption is the process of transforming data so that only authorized parties can understand it. You take the data in its original form, called the plaintext, and you pass it, along with a secret encryption key, through an algorithm called a cipher to encrypt the data into a new form called the ciphertext. The ciphertext should be completely unreadable, essentially indistinguishable from a random string, so it’s useless to anyone without the encryption key. The only way to get back the original plaintext is to use the cipher with the encryption key to decrypt the ciphertext back into plaintext.
Most modern cryptography systems are built according to Kerckhoffs’s principle, which states that the system should remain secure even if everything about the system, except the encryption key, is public knowledge. This is essentially the opposite of security through obscurity, where your system is only secure as long as adversaries don’t know how that system works under the hood, an approach that rarely works in the real world. Instead, you want to use cryptographic systems where even if the adversary knows every single detail of how that system works, it should still not be feasible for them to turn ciphertext back into plaintext (without the encryption key).
Note that I used the phrase "not be feasible" rather than "not be possible." You could only say "not be possible" about the small number of ciphers that offer perfect secrecy (AKA information-theoretic security), which are secure even against adversaries with unlimited resources and time. For example, in the 1940s, Claude Shannon proved that it is impossible to crack the one-time pad cipher, but this cipher relies on an encryption key that is (a) at least as long as the plaintext, (b) truly random, and (c) never reused in whole or in part. Distributing such encryption keys while keeping them secret is a significant challenge, so such ciphers are only used in special situations (e.g., critical military communications).
Instead of perfect secrecy, the vast majority of ciphers aim for computational security, where the resources and time it would take to break the cipher are so high, that it isn’t feasible in the real world. To put that into perspective, a cryptographic system is considered strong if the only way to break it is through brute force algorithms, where you have to try every possible encryption key. If the key is N bits long, then to try every key, you’d have to try 2N possibilities, which grows at an astonishing rate, so by the time you get to a 128-bit key, it would take the world’s fastest supercomputer far longer than the age of the universe to try all 2128 possibilities.[34]
Note that you’d only have to try all 2128 possibilities if the key is truly random, and therefore has 128 bits of information entropy. The number of bits of entropy in a key of length \(L\) that is randomly generated from an alphabet of length \(S\) is \(log_2 S^L\). So if you randomly generate a key, but you limit the characters to the 26 (lower case) letters in the English alphabet, then even if that key is 128 bits (16 characters) long, you only get \(log_2 26^{16} = 75\) bits of entropy. And if the key isn’t randomly generated—for example, if it’s a password a person came up with using standard dictionary words—then the number of bits of entropy is far lower. This is why you should use randomly-generated keys and passwords whenever possible.
Broadly speaking, there are three types of encryption:
-
Symmetric-key encryption
-
Asymmetric-key encryption
-
Hybrid encryption
The following sections will dive into these, starting with symmetric-key encryption.
Symmetric-key encryption
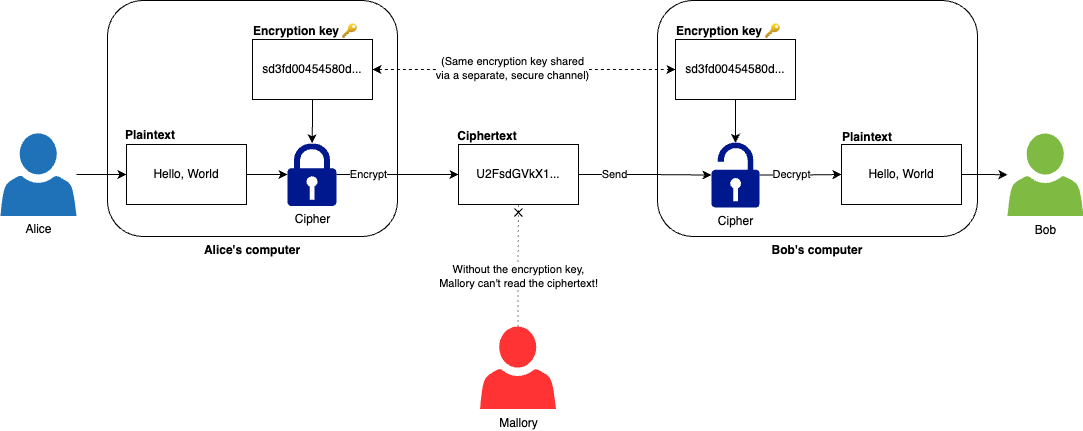
Symmetric-key encryption uses a single encryption key for both encryption and decryption. For example, as shown in Figure 71, Alice can use an encryption key to encrypt the plaintext "Hello, World" into ciphertext before sending it to Bob, and then Bob can use the same encryption key to decrypt the ciphertext back into plaintext. If a malicious actor named Mallory somehow gets hold of the ciphertext, he can’t read it, as he doesn’t have access to the encryption key.
Symmetric-key encryption algorithms use the encryption key to perform transformations on the plaintext, mostly consisting of substitutions and transpositions. A substitution is where you exchange one symbol for another. You’ve most likely come across a simple substitution cipher where you uniformly swap one letter in the alphabet for another, such as shifting each letter by one, so A becomes B, B becomes C, and so on. A transposition is where the order of symbols is rearranged. Again, you’ve most likely come across a simple transposition cipher in the form of anagrams, where you randomly rearrange the letters in a word, so that "hello" becomes "leohl." Modern encryption algorithms also use substitution and transposition, but in more complicated, non-uniform patterns that depend on the encryption key.
Some of the well-known symmetric-key encryption algorithms include DES, 3DES, RC2, RC4, RC5, RC6, Blowfish, Twofish, AES, Salsa20, and ChaCha. Many of these are now dated and considered insecure, so the primary ones you should be using in most contexts as of 2024 are the following:
- AES
-
AES (Advanced Encryption Standard) is the winner of a competition organized by NIST, the official recommendation of the US government, free to use for any purpose, widely supported in many programming languages and libraries, extremely fast (some CPUs even have built-in AES instruction sets), and after more than two decades of intensive use and analysis, is still considered secure. You should typically be using AES-GCM, a version of AES that includes a MAC (message authentication code), which you’ll learn about in the hashing section.
- ChaCha
-
ChaCha is a newer cipher that also has its roots in winning a competition (one organized by eSTREAM), is free to use for any purpose, and is extremely fast (faster than AES on general hardware, but slower than AES on CPUs with AES instruction sets). Compared to AES, it is theoretically more secure against certain types of attacks, but it’s not as widely supported. You should typically be using ChaCha20-Poly1305, a version of ChaCha that includes a MAC.
The main advantage of symmetric-key encryption is that it is typically faster than asymmetric-key encryption. The main drawback of symmetric-key encryption is that it’s hard to distribute the encryption key in a secure manner. If you try to send it to someone as plaintext, then a third party could intercept the message, steal the key, and use it to decrypt anything you encrypted later. You could try to encrypt the key, but that requires another encryption key, so that just brings you back to square one. Until the 1970s, the only solution was to share keys via an out-of-band channel, such as exchanging them in-person, which does not scale well. In the 1970s, asymmetric-key encryption provided a new solution to this problem, as discussed next.
Asymmetric-key encryption
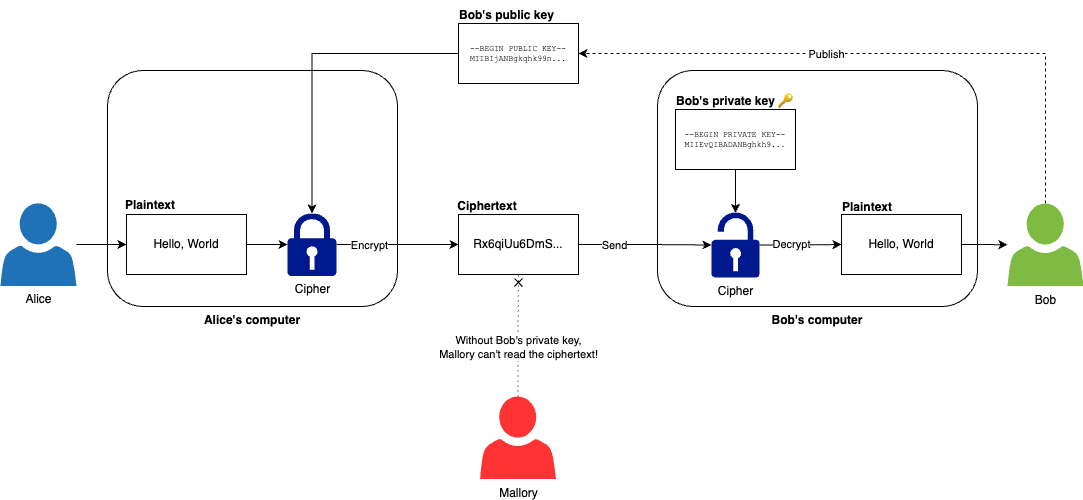
Asymmetric-key encryption, also known as public-key encryption, uses a pair of related keys, which include a public key that can be shared with anyone and used to encrypt data, and a private key, which must be kept a secret, and can be used to decrypt data. For example, as shown in Figure 72, Alice can use Bob’s public key to encrypt the plaintext "Hello, World" into ciphertext before sending it to Bob, and Bob can use his private key to decrypt the ciphertext back into plaintext. If a malicious actor named Mallory somehow gets hold of the ciphertext, he can’t read it, as he doesn’t have access to Bob’s private key.
The public and private key and the encryption and decryption are all based on mathematical functions. The math behind these functions is beautiful, and worth learning, but beyond the scope of the blog post series (see Chapter 8 recommended reading if you’re interested). All you need to know for now is that you can use these functions to create a linked public and private key, such that data encrypted with the public key can only be decrypted with the corresponding private key, and that it’s safe to share the public key, as there’s no way to derive the corresponding private key from it (other than brute force, which is not feasible with the large numbers used in asymmetric-key encryption). The two most common asymmetric-key encryption algorithms you should be using today are:
- RSA
-
RSA, based on the surnames (Rivest, Shamir, Adleman) of its creators, was one of the first asymmetric-key encryption algorithms. The underlying math is based on prime-number factorization, which is relatively easy to understand, so it’s often used as the canonical example of asymmetric-key encryption. RSA has been around since the 1970s, so it is ubiquitous, but it’s also starting to show its age, and a number of vulnerabilities have been found in earlier versions, both in the algorithm, and the various implementations. These days, you should typically be using RSA-OAEP (Optimal Asymmetric Encryption Padding), as it addresses known vulnerabilities.
- Elliptic Curve Cryptography
-
Elliptic Curve Cryptography is a more recent asymmetric-key approach, based on the math of elliptic curves. It is considered more secure, both in its design, and in the implementations that are out there. You should typically be using Elliptic Curve Integrated Encryption Scheme (ECIES), which is actually a hybrid approach that combines asymmetric-key and symmetric-key encryption, as discussed next.
The advantage of asymmetric-key encryption is that you don’t need to share an encryption key in advance. Instead, each user shares their public keys, and all other users can use those to encrypt data. This has made it possible to have secure digital communications over the Internet, even with total strangers, where you have no pre-existing out-of-band channel to exchange encryption keys. That said, asymmetric-key encryption has two major drawbacks. First, it is considerably slower than symmetric-key encryption, and second, it is usually limited in the size of messages you can encrypt. Therefore, it’s rare to use asymmetric-key encryption by itself. Instead, you typically use hybrid encryption, as per the next section.
Hybrid encryption
Hybrid encryption combines both asymmetric and symmetric encryption, using asymmetric-key encryption initially to exchange an encryption key, and then symmetric-key encryption for all messages after that. For example, if Alice wants to send a message to Bob, she first generates a random encryption key to use for this session, encrypts it using Bob’s public key, and then sends this encrypted message to Bob. After that, she uses symmetric-key encryption with the randomly-generated encryption key to encrypt all subsequent messages to Bob. This provides a number of advantages:
- No reliance on out-of-band channels
-
You get to use symmetric-key encryption without the need to set up some other secure out-of-band channel ahead of time to exchange the encryption key.
- Performance
-
Most of the encryption is done with symmetric-key encryption, which is fast, efficient, and has no limits on message sizes.
- Forward secrecy
-
Hybrid encryption can achieve forward secrecy, which means that even in the disastrous scenario where a malicious actor is able to compromise Alice’s private key, they still won’t be able to read any of the data in any previous conversation. That’s because each of those conversations is encrypted with a different, randomly-generated encryption key, which Alice never stores, and when Alice shares that encryption key with other users, she encrypts those messages with the public keys of those users, so compromising Alice’s private key doesn’t allow you to compromise any of those past messages.
ECIES, which I introduced in the previous section, is actually a hybrid encryption approach. It’s a trusted standard for doing a secure key exchange using elliptic curve cryptography for asymmetric-key encryption, followed by symmetric-key encryption using one of several configurable algorithms (e.g., AES).
Now that you’ve seen some of the basic theory behind encryption, let’s see what it looks like in practice by trying out a few real-world examples.
Example: encryption and decryption with OpenSSL
|
Watch out for snakes: don’t use OpenSSL to encrypt data in production
The OpenSSL binary is available on most systems, so it’s convenient for learning and experimenting, but I do not recommend using it to encrypt data for production, as the algorithms it supports are dated and incomplete (e.g., it doesn’t support AES-GCM) and the defaults it exposes are insecure and error-prone. For production use cases, use mature cryptography libraries built into programming languages (e.g., the Go crypto library) or CLI tools such as GPG or age (full list). |
Let’s do a quick example of encrypting and decrypting data on the command-line using OpenSSL, which is installed by default on most Unix, Linux, and macOS systems. We’ll start with symmetric encryption. Run the following command to encrypt the text "Hello, World" using AES:
$ echo "Hello, World" | openssl aes-128-cbc -base64 -pbkdf2

U2FsdGVkX19V9Ax8Y/AOJT4nbRwr+3W7cyGgUIunkac=
openssl will prompt you for a passphrase (twice). If you were exchanging data between two automated systems, you’d
use a randomly-generated, 128-bit key instead of a password. However, for this exercise, and in use cases where you
rely on human memory, you use a password that a person came up with. Since human-generated passwords are typically not
exactly 128-bits long, OpenSSL uses a key derivation function called PBKDF2 to derive a 128-bit key from that
password. This derivation process does not add any entropy, so if the password isn’t randomly generated, it will be
easier to break (through brute force) than a randomly-generated 128-bit key, but for use cases where you rely on
memorization, that’s a risk you have to accept.
Once you enter your passphrase, you’ll get back a base64-encoded string, such as the "U2Fsd…" text you see in the preceding output. This is the ciphertext! As you can see, there’s no way to guess this jumble of letters and numbers came from the text "Hello, World." You could safely send this to someone, and even if the message is intercepted, there is no way for the malicious attacker to understand what it said without the encryption key. The only way to get back the plaintext is to decrypt it using the same algorithm and key:
$ echo "<CIPHERTEXT>" | openssl aes-128-cbc -d -base64 -pbkdf2

Hello, World
You’ll again be prompted for your passphrase, so make sure to enter the same one, and OpenSSL will decrypt the ciphertext back into the original "Hello, World" plaintext. Congrats, you’ve successfully encrypted and decrypted data using AES!
Let’s now try asymmetric-key encryption. First, create a key pair as follows:
$ openssl genrsa -out private-key.pem 2048

$ openssl rsa -in private-key.pem -pubout -out public-key.pem
This creates a 2048-bit RSA private key in the file private-key.pem and the corresponding public key in public-key.pem. You can now use the public key to encrypt the text "Hello, World" as follows:
$ echo "Hello, World" | \

  openssl pkeyutl -encrypt -pubin -inkey public-key.pem | \

  openssl base64

YAYUStgMyv0OH7ZPSMcibbouNwLfTWKr...
This should output a bunch of base64-encoded text, which is the ciphertext. Once again, the ciphertext is indistinguishable from a random string, so you can safely send it around, and no one will be able to figure out the original plaintext without the private key. To decrypt this text, run the following command:
$ echo "<CIPHERTEXT>" | \

  openssl base64 -d | \

  openssl pkeyutl -decrypt -inkey private-key.pem

Hello, World
This command first decodes the base64 text and then uses the private key to decrypt the ciphertext, giving you back "Hello, World." Congrats, you’ve successfully encrypted and decrypted data using RSA! That means it’s time for one of my favorite jokes:
Perl – The only language that looks the same before and after RSA encryption.
Now that you’ve had a chance to experiment with encryption, let’s move on to the next major cryptography topic, hashing.
Hashing
A hash function is a function that can take a string as input and convert it to a hash value (sometimes also called a digest or just a hash) of fixed size, in a deterministic manner, so that given the same input, you always get the same output. For example, the SHA-256 hash function always produces a 256-bit output, whether you feed into it a file that is 1 bit long or 5 million bits long, and given the same file, you always get the same 256-bit output.
Hash functions are one-way transformations: it’s easy to feed in an input, and get an output, but given just the output, there is no way to get back the original input. This is a marked difference from encryption functions, which are two-way transformations, where given an output (and an encryption key), you can always get back the original input.
Non-cryptographic hash functions are used in applications that don’t have rigorous security requirements. For example, you’ve probably come across them used in hash tables in almost every programming language; they are also used for error-detecting codes, cyclic redundancy checks, bloom filters, and many other use cases. Cryptographic hash functions, which are primarily what we’ll focus on in this section, are hash functions that have special properties that are desirable for cryptography, including the following:
- Pre-image resistance
-
Given a hash value (the output), there’s no way to figure out the original string (the input) that was fed into the hash function to produce that output (you’d have to use brute force to try every possible value, which is not feasible).
- Second pre-image resistance
-
Given a hash value (the output), there’s no way to find any string (the original or any other input) that could be fed into the hash function to produce this output.
- Collision resistance
-
There’s no way to find any two strings (any two inputs) that produce the same hash value (the same output).
The common cryptographic hashing algorithms out there are MD5, SHA-0, SHA-1, SHA-2, SHA-3, SHAKE, and cSHAKE. Many of these are no longer considered secure, so these days, the only ones you should be using in most contexts are:
- SHA-2 and SHA-3
-
The Secure Hash Algorithm (SHA) family is a set of cryptographic hash functions created by the NSA. While the SHA-1 family is no longer considered secure, SHA-2 (including SHA-256 and SHA-512) and SHA-3 (including SHA3-256 and SHA3-512) are considered safe to use and are part of NIST standards.
- SHAKE and cSHAKE
-
Whereas most hash functions produce outputs of the same length (e.g., SHA-256 always produces hashes that are 256 bits long), SHAKE (Secure Hash Algorithm and KECCAK) and cSHAKE (customizable SHAKE) are cryptographic hash functions based on SHA-3, but with the added ability to produce an output of any length you specify (sometimes referred to as extendable output functions), which can be useful in certain contexts.
Cryptographic hash functions have a variety of uses:
-
Verifying the integrity of messages and files
-
Message authentication codes (MAC)
-
Authenticated encryption
-
Digital signatures
The following sections will take a brief look at each of these, starting with verifying the integrity of messages and files.
Verifying the integrity of messages and files
When making a file available for download, it’s common to share the hash of the file contents, too. For example, if you make a binary called my-app available through a variety of sources—e.g., APT for Ubuntu, MacPorts for macOS, Chocolatey for Windows—you could compute the SHA-256 hash of my-app, and post the value on your website. Anyone who downloads my-app can then compute the SHA-256 of the file they downloaded and compare that to the official hash on your website. If they match, they can be confident they downloaded the exact same file, and that nothing has corrupted it or modified it along the way. That’s because if you change even 1 bit of the file, the resulting hash will be completely different.
Message authentication codes (MAC)
A message authentication code (MAC) combines a hash with a secret key to create an authentication tag for some data that allows you to not only verify the integrity of the data (that no one modified it), but also the authenticity (that the data truly came from an intended party). For example, you can use a MAC to ensure the integrity and authenticity of cookies on your website. When a user logs in, you might want to store a cookie in their browser with their username, so they don’t have to log in again. If you do this naively and store just the username, then a malicious actor could easily create a cookie pretending to be any user they wanted to be.
The solution is to store not only the username in the cookie, but also an authentication tag, which you compute from the username and a secret key. Every time you get a cookie, you compute the authentication tag on the username, and if it matches what’s stored in the cookie, you can be confident that this was a cookie only your website could’ve written, and that it could not have been modified in any way. That’s because if you modify even 1 bit of the username, you would get a completely different authentication tag, and without the secret key, there is no way for a malicious actor to guess what that new tag should be.
The standard MAC algorithms you should be using are:
- HMAC
-
Hash-based MAC (HMAC) is a NIST standard for computing a MAC using various hash functions: e.g., HMAC-SHA256 uses SHA-256 as the hash function.
- KMAC
-
A MAC that based on cSHAKE.
One of the most common uses of MACs is to make symmetric-key encryption more secure, as discussed in the next section.
Authenticated encryption
Symmetric-key encryption can prevent unauthorized parties from seeing your data, but how would you ever know if they modified that data (e.g., injected some noise into the ciphertext or swapped it out entirely)? The answer is that, instead of using symmetric-key encryption by itself, you almost always use authenticated encryption, which combines symmetric-key encryption with a MAC. The symmetric-key encryption prevents unauthorized parties from reading your data (confidentiality) and the MAC prevents them from modifying your data (integrity and authenticity).
The way it works is that for every encrypted message, you use a MAC to calculate an authentication tag, and you include this associated data (AD) with the message as plaintext. When you receive a message with AD, you use the same MAC with the same secret key to calculate your own authentication tag, and if it matches the authentication tag in the AD, you can be confident that the encrypted data could not have been tampered with in any way. If even 1 bit of the encrypted data had been changed, the authentication tag would have been completely different, and there’s no way for someone to guess the new tag without the secret key.
Both of the encryption algorithms I recommended in the symmetric-key encryption section, AES-GCM and ChaCha20-Poly1305, are actually authenticated encryption with associated data (AEAD) protocols that combine a MAC with encryption, as in almost all cases, this is more secure to use than symmetric-key encryption alone.
Digital signatures
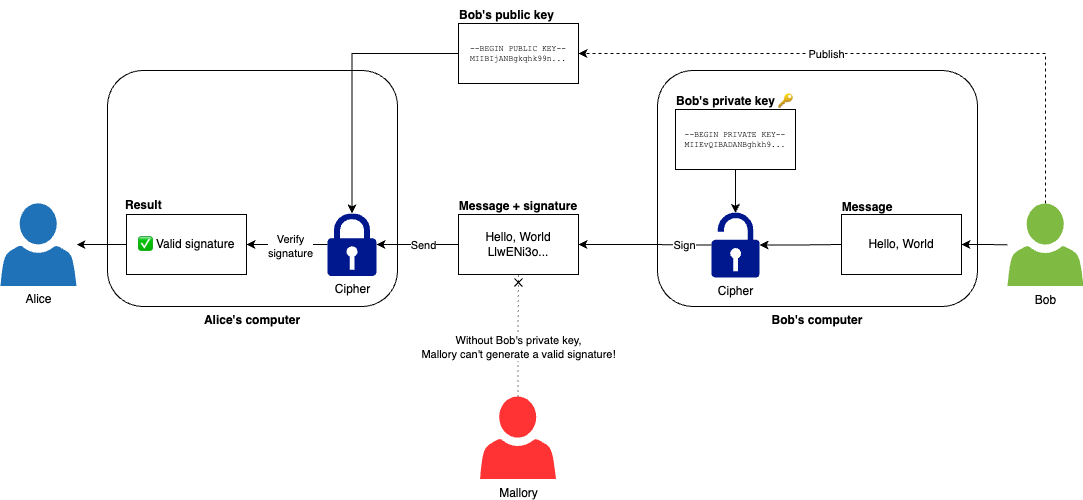
If you combine a hash function with asymmetric-key encryption, you get a digital signature, which can allow you to validate the integrity and authenticity of a message. For example, Bob can take a message such as "Hello, World," and using his private key and a hash function, he can generate a signature for that message, which he can then send to Alice, along with the original message, as shown in Figure 73. Alice can then use Bob’s public key to validate the signature. If the signature is valid, then Alice can be confident the message came from Bob, as he’s the only one with access to the corresponding private key. If a malicious actor like Mallory modified even a single bit of the message along the way, the signature validation would fail, and without Bob’s private key, Mallory has no way to generate a new, valid signature.
You’ve now seen a few of the common use cases for hash functions. To get a better feel for them, let’s try some out with a few real-world examples.
Example: file integrity, HMAC, and signatures with OpenSSL
Let’s start with an example of using hash functions to check the integrity of a file. First, create a file called file.txt that contains the text "Hello, World":
$ echo "Hello, World" > file.txtNext, use OpenSSL to calculate a hash for the file using SHA-256:
$ openssl sha256 file.txt

SHA2-256(file.txt)= 8663bab6d124806b...
You should get back the exact same hash value (which starts with 8663bab6d124806b…), as given the same input, a
hash function always produces exactly the same output. Now, watch what happens if you modify just one character of the
file, such as making the "w" in "World" lower case:
$ echo "Hello, world" > file.txtCalculate the SHA-256 hash again:
$ openssl sha256 file.txt

SHA2-256(file.txt)= 37980c33951de6b0...
As you can see, the hash is completely different!
Now, let’s try an example of using a MAC to check the integrity and authenticity of a file. You can use the exact same
openssl command, but this time, add the -hmac <PASSWORD> argument, with some sort of password to use as a secret
key, and you’ll get back an authentication tag:
$ openssl sha256 -hmac password file.txt

HMAC-SHA2-256(file.txt)= 3b86a735fa627cb6...
If you had the same file.txt contents and used the same password as me, you should get back the exact same
authentication tag (which starts with 3b86a735fa627cb6…). But once again, watch what happens if you modify
file.txt, perhaps this time making the "H" lower case in "Hello":
$ echo "hello, world" > file.txtGenerate the authentication tag again:
$ openssl sha256 -hmac password file.txt

HMAC-SHA2-256(file.txt)= 1b0f9f561e783df6...
Once again, changing even a single character in a file results in a totally different output. But now, you can only get this output if you have the secret key (the password). With a different secret key, such as "password1", the output will not be the same:
$ openssl sha256 -hmac password1 file.txt

HMAC-SHA2-256(file.txt)= 7624161764169c4e...
Finally, let’s try a digital signature, reusing the public and private keys from the encryption example section earlier in this blog post. First, compute the signature for file.txt using your private key, and write the output to file.txt.sig:
$ openssl sha256 -sign private-key.pem -out file.txt.sig file.txtNext, you can validate the signature using your public key:
$ openssl sha256 -verify public-key.pem -signature file.txt.sig file.txt

Verified OK
Try modifying anything—the signature in file.txt.sig, the contents of file.txt, your private key, or your public key—and the signature verification will fail. For example, remove the comma from the text in file.txt, and then try to verify the signature again:
$ echo "hello world" > file.txt

$ openssl sha256 -verify public-key.pem -signature file.txt.sig file.txt

Verification failure
Now that you’ve had a chance to see encryption and hashing in action, you should understand the primitives that make secure storage and communication possible, so let’s move on to the use cases, starting with secure storage.
Secure Storage
The first use case for cryptography that we’ll look at is storing data securely. That is, how do you write data to a hard drive in a way that provides confidentiality, integrity, and authenticity? The answer, as you can probably guess from the cryptography primer, mostly consists of using encryption. In fact, secure data storage is often referred to as encryption at rest, as opposed to encryption in transit, which is the topic of secure communication, which we’ll come back to later.
Encryption always relies on a secret key, so a prerequisite to secure data storage is being able to manage secrets securely, including encryption keys, passwords, tokens, certificates, and so on. So we’ll start with a look into the specialized topic of secrets management in the next section, and then we’ll come back to the more general topic of encryption at rest in the section after that.
Secrets Management
At some point, you and your software will be entrusted with a variety of secrets, such as encryption keys, database passwords, TLS certificates, and so on. This is all sensitive data that, if it were to get into the wrong hands, could do a lot of damage to your company and its customers. If you build software, it is your responsibility to keep those secrets secure. To do that, you need to learn about secrets management.
The first rule of secrets management is:
Do not store secrets as plaintext.
The second rule of secrets management is:
DO NOT STORE SECRETS AS PLAINTEXT.
Do not put plaintext secrets directly into your code and check them into version control. Do not send plaintext secrets to colleagues through email or chat. Do not store your plaintext passwords in a .txt file on your desktop or in Google Docs.
If you store secrets in plaintext on a hard drive, then you may end up with copies of those secrets scattered across thousands of computers. For example, if you ignore my advice and store plaintext secrets in version control, copies of these secrets may end up on the computers of every developer on your team, computers used by the version control system itself (e.g., GitHub), computers used for CI (e.g., GitHub Actions), computers used for deployment (e.g., HashiCorp Cloud Platform), computers used to host your software (e.g., AWS), computers used to back up your data (e.g., iCloud), and so on. A vulnerability in any piece of software on any of those computers may leak your secrets to the world.
|
Key takeaway #2
Do not store secrets as plaintext. |
The secure way to store secrets is in a secret management tool. Which secret management tool you use depends on the type of secret you need to store. Broadly speaking, secrets fall into one of the following three buckets:
- Personal secrets
-
These are secrets that belong to a single person, or are shared with several people. Examples: passwords for websites, SSH keys, credit card numbers.
- Infrastructure secrets
-
These are secrets that need to exposed to the servers running your software. Examples: database passwords, API keys, TLS certificates.
- Customer secrets
-
These are secrets that belong to the customers that use your software. Examples: usernames and passwords that your customers use to log into your software, personally identifiable information (PII) for your customers, and personal health information (PHI) for your customers.
Most secret management tools are designed to store exactly one of these types of secrets, and forcing it to store other types of secrets is usually a bad idea. For example, the secure way to store passwords that are infrastructure secrets is completely different from the secure way to store passwords that are customer secrets, and using the wrong approach can be catastrophic from a security perspective.
The best way to avoid these sorts of catastrophes is to avoid storing secrets in the first place. Here are a few common alternatives:
- Single-sign on (SSO)
-
Instead of trying to securely store user passwords, you can use single-sign on (SSO), where you allow users to log in with an existing identity provider (IdP), using a standard such as SAML, OAuth, OpenID, LDAP, or Kerberos. For example, you might allow users to sign in using an existing work account, where the IdP is something like Active Directory or Google Workspaces, or you might allow users to sign in using an existing social media account, where the IdP is something like Facebook, Twitter, or GitHub. You could also consider using magic links, where each time a user wants to log in, you email them a temporary, one-time sign-in link, which leverages their existing email account as an IdP.
- Third-party services
-
Instead of trying to store certain sensitive data yourself, you could offload this work to reputable third-party services. For example, instead of storing user credit cards yourself, and being subject to PCI compliance standards, most companies these days leverage 3rd party payment services such as Stripe or Chargebee (full list); instead of managing user passwords yourself, you can use 3rd party authentication services such as Auth0 or Okta (full list).
- Don’t store the data at all
-
Sometimes, you don’t need to store the data at all. In fact, many of us wish that companies would store a little less data about us—especially PII and PHI. If it isn’t absolutely necessary for your business to store that data, then don’t, and you instantly avoid a number of security and compliance headaches.
These approaches typically save your company time, provide a better experience for your users, and make everyone more secure. Use them whenever possible.
|
Key takeaway #3
Avoid storing secrets whenever possible by using SSO, 3rd party services, or just not storing the data at all. |
Of course, sometimes you can’t use these approaches, and you need to store the data yourself, in which case, you need to make sure you’re using the right tools for the job. The following sections will dive into the tools and techniques you should use for different types of secrets, starting with personal secrets.
Personal secrets
To store personal secrets securely, such as passwords, you typically need to use symmetric-key encryption, so your secrets are encrypted when they are on disk, and can only be decrypted with an encryption key. As you may remember, rolling your own cryptography is a bad idea, so instead, you should use a mature, off-the-shelf password manager, which is a piece of software designed to provide secure storage for personal secrets, including not only passwords, but also credit card numbers, identity documents (e.g., passport, social security card), API tokens, and more. Some of the major players in this space include standalone password managers such as 1Password and Bitwarden; password managers built into operating systems, such as macOS password manager and Windows Credential Manager; and password managers built into web browsers, such as Google Password Manager and Firefox Password Manager (full list).
|
Key takeaway #4
Protect personal secrets, such as passwords and credit card numbers, by storing them in a password manager. |
Generally speaking, using almost any reasonable password manager is going to be more secure than not using one at all. That said, since you are trusting the password manager with some of your most valuable data, make sure you pick a password manager that is transparent about their security practices (e.g., see 1Password security practices and Bitwarden security FAQ), goes through regular audits from independent third parties (e.g., see security audits of 1Password and Bitwarden Compliance, Audits, and Certifications), supports multi-factor authentication (MFA) and convenient login methods such as Touch ID, Face ID, and PassKeys, provides a way to share secrets with others (e.g., family plans or team plans), and works on all the platforms you use (desktop app, mobile app, CLI integration, web browser integration).
Perhaps most important of all, make sure that the password manager uses end-to-end encryption. You’ll learn more about this topic later in this blog post, but for now, the key thing to understand is that it should be impossible for the password manager vendor (or anyone else) to read your data, even if your data is stored on their servers, or even if that data is compromised, as your data should be encrypted before it leaves your device, using a password that is not stored anywhere (other than in your mind).
That means that the password you pick to access your password manager is likely the single most important password in your life. It’s essential that you pick a strong password here. Here are the key factors that make a password strong:
- Unique
-
If you use the same password with multiple websites, then if even one of those websites (the weakest link) is compromised and your password leaks, a malicious actor can use that password to access all your other accounts. There are data breaches all the time, and the last thing you want is for a breach on some website you used once a decade ago to allow a hacker to take over your most important accounts (e.g., your bank account) because you used the same password in multiple places. Therefore, every password you use should be completely unique.
- Long
-
The longer the password, the more bits of entropy it will have, and the harder it is to break. To put it into perspective, it would take only a few hours to break a typical 8-character password, whereas it would take several centuries to break a 15-character password. I recommend using the longest password you can remember, with 15-characters as the bare minimum.
- Hard-to-guess
-
Passwords that contain common phrases and patterns are easier to break. Have a glance through the list of most common passwords for patterns to avoid, such as 123456, password, qwerty, 111111, and so on.
So, how do you come up with a unique, long, hard-to-guess password that you can actually remember? The best strategy I’ve seen is to use Diceware, where you take a list of thousands of easy-to-remember English words, roll the dice a bunch of times to pick 4-6 such words at random, and glue them together to create a password that is unique, long, and hard-to-guess—but easy to memorize (e.g., "correct-horse-battery-staple," as per XKCD #936). You can follow the instructions on the Diceware website to come up with a Diceware password by hand, or you can use the web-based Diceware Password Generator, the CLI tool diceware, or similar password generators that are built into your password manager tool (many of which are based on Diceware).
This may seem like a lot of work for a password, but once you start using a password manager, this will be the only password you’ll need to memorize. All your other passwords will be stored in the password manager, so there’s no need to remember them. In fact, it’s better if you can’t remember them. That is, you should use the password generator built into your password manager to generate a different, random, strong password for every website you use. That way, if one of those websites is compromised, and your password leaks, it only affects that website, and nothing else.
Now that you know how to store personal secrets, let’s move on to infrastructure secrets.
Infrastructure secrets
To store infrastructure secrets securely, such as database passwords and TLS certificates, you again need to use symmetric-key encryption, and again, you will want to rely on battle-tested, off-the-shelf software. However, password managers are usually not the right fit for this use case, as they are typically designed to store permanent secrets that are accessed by a human being (who can memorize a password), whereas with infrastructure, you need support for temporary secrets (those that expire after some period of time) and secrets accessed by automated software (where there’s no human being around to type in a password). For this use case, you should use a secret store designed to protect infrastructure secrets, integrate with your infrastructure, and support authentication for both human and machine users. Human users authenticate to the secret store through passwords or SSO. Machine users authenticate to the secret store using one of the mechanisms you learned about in Section 5.1.5.
There are two primary kinds of secret stores for infrastructure secrets:
- Key management systems (KMS)
-
A key management system (KMS) is a secret store designed to securely store encryption keys. Most of these are services where you send them data, they perform the encryption operations on the KMS server, and send you back the result, without the underlying encryption key ever leaving the KMS server (which makes it less likely to be compromised). One option for KMS is to use a hardware security module (HSM), such as those from Thales or Yubico, which are physical devices that include a number of software and hardware features to safeguard your secrets and prevent tampering. Another option for KMS is to use managed services such as AWS KMS, or Azure Key Vault (full list), many of which also use HSMs under the hood.
Note that a KMS is typically optimized for security, not speed, so it’s rare to use a KMS to encrypt large amounts of data. The more common approach is to use envelope encryption, where you generate one or more encryption keys called data keys, which your app keeps in memory and uses for the vast majority of your encryption and decryption, and you use the KMS to manage a root key, which you use to encrypt the data keys when storing them on disk, and decrypt when loading them into memory (e.g., when an app is booting).
- General-purpose secret store
-
A general-purpose secret store is a data store designed to securely store a variety of types of secrets, such as encryption keys, database passwords, and TLS certificates, and perform a variety of cryptographic functions, such as encryption, hashing, signing, and so on. The major players in this space include standalone secret stores such as HashiCorp Vault / OpenBao (OpenBao is a fork of Vault that was created after HashiCorp switched Vault’s license to BSL); secret stores from cloud providers such as AWS Secrets Manager and Google Cloud Secret Manager (many of which use the corresponding cloud’s KMS to manage encryption keys); and secret stores built into orchestration tools, such as Kubernetes Secrets (full list).
|
Key takeaway #5
Protect infrastructure secrets, such as database passwords and TLS certificates, by using a KMS and/or a general-purpose secret store. |
These days, general-purpose secret stores are becoming more popular, as they keep all your secrets centralized, in a single place, rather than having little bits of ciphertext all over the place. Centralization offers the following advantages:
- Audit logging
-
Every time a secret is accessed, a centralized secret store can record that in an audit log. A KMS can also log access to encryption keys, but the KMS has no way of knowing what secrets those encryption keys are being used to encrypt or decrypt, and if you use envelope encryption, the KMS can’t track what you do with the data keys.
- Revoking and rotating secrets
-
Occasionally, you may need to revoke a secret: e.g., if you know it was compromised. It’s also a good practice to automatically rotate secrets on a regular basis, where you revoke the old version of a secret, and start using a new one. That way, you significantly reduce the window of time during which a compromised secret could be used to do damage. Revoking and rotating are both easier to do if all your secrets are in a centralized secret store than if you use a KMS to encrypt secrets and store the ciphertext in a variety of locations.
- On-demand and ephemeral secrets
-
Even better than rotating secrets is to not have long-term secrets at all. Instead, you generate secrets on-demand, when someone actively needs to use the secret, and you make those secrets ephemeral, so they automatically expire after a short period of time and/or after some number of usages. For example, instead of each developer having a permanent SSH key, tools like Teleport support Just-in-Time Access Requests, where developers can use a web UI or CLI to request SSH access when they actually need it, admins can use a web UI or CLI to approve or deny that access request, and any SSH access that is approved automatically expires after a configurable amount of time (e.g., 24 hours). Both on-demand and ephemeral secrets are easier to do with a centralized secret store that integrates with all of your infrastructure.
Now that you’ve seen how to manage secrets that belong to your company, let’s look at how to manage secrets that belong to your customers.
Customer secrets and password storage
To store customer secrets securely, you first have to consider what type of secret you’re storing. There are two buckets to consider: the first bucket is for user passwords and the second bucket is for everything else (e.g., financial data, health data, and so on). The first bucket, user passwords, requires special techniques, so that’s what we’ll look at in this section.
User passwords have to be handled differently than other types of customer secrets for two reasons. First, attackers are trying to compromise passwords all the time: Forbes estimates that 46% of Americans have had their passwords stolen just in 2023, and in 2024, a user posted nearly 10 billion unique leaked passwords on a hacker forum (known as the RockYou2024 leak). Second, you do not need to store the original user password at all, encrypted or otherwise (which means all these password leaks were completely avoidable)! Instead, the way to manage customer passwords is to do the following:
- Store the hash of the password
-
When the user creates a password, feed it into a cryptographic hash function, store the hash value, and throw away the original. When the user tries to log in, feed their password into the same cryptographic hash function, and compare it to the hash value you stored: if they are the same, then the user must have typed in the correct password. Using a hash function allows you to authenticate users without storing their passwords! This is a huge win, for if you have a breach, all the attacker gets access to are hash values, and since hash functions are one-way, the attacker has no way to figure out what the original passwords were, other than to try a brute force attack. That said, hackers are clever, and rather than a naive brute force attack where they try every possible string of every possible length, they only try words from a dictionary of commonly-used words and previously-leaked passwords (called a dictionary attack), and they pre-compute all the hashes for this dictionary into a table that shows each password and its hash side-by-side (called a rainbow table attack), which allows them to quickly translate the stolen hashes back into the original passwords. To defeat these attacks, you need to do the next two items.
- Use specialized password hash functions
-
Instead of standard cryptographic hash functions such as SHA-2, you must use specialized password hash functions. The main ones to consider these days, in order from most to least recommended, are Argon2 (specifically the Argon2id variant), scrypt, bcrypt, and PBKDF2. These functions are intentionally designed to run slowly and take up a lot of resources, which makes brute force attacks harder. To put it into perspective, with modern hardware, running SHA-256 on a typical password will take less than 1 millisecond, whereas Argon2 will take 1-2 seconds (~1000x slower) and use up way more memory.
- Use salt and pepper
-
A salt is a unique, random string that you generate for each user, which is not a secret, so you store it in plaintext next to the user’s other data in your user database. A pepper is a shared string that is the same for all your users, which is a secret, so you store it in an encrypted form separate from your user database (e.g., in a secret store with your other infrastructure secrets). The idea is that the hash you store in your user database is actually a hash of the combination of the user’s password, their unique salt, and the shared pepper:
hash(password + salt + pepper). This helps you defeat dictionary and rainbow table attacks, as to have useful tables, attackers would now need to break into two of your systems—the user database to get the hashes and salts, and your secret store to get the pepper—and they’d have to create not one precomputed table, but one table for each user (for each salt), which with slow password hash functions is not feasible. As an added bonus, using salts ensures that even users with identical passwords end up with different hashes.
There is a lot of complexity to this, so it bears repeating: don’t roll your own cryptography. Use mature, battle-tested libraries to handle this stuff for you.
|
Key takeaway #6
Never store user passwords (encrypted or otherwise). Instead, use a password hash function to compute a hash of each password with a salt and pepper, and store those hash values. |
Let’s now turn our attention to the other bucket, which is how to store all other types of customer secrets, such as financial data (e.g., credit cards) and health data (e.g., PHI). For these use cases, you typically do need to store the original data (unlike user passwords), which means that you need to encrypt that data. This brings us to the realm of encryption at rest, which is the focus of the next section.
Encryption at Rest
When you store data on a hard-drive, it becomes a tempting target for attackers. There are a few reasons for this:
- Many copies of the data
-
In a typical software architecture, you not only have the data stored in an original database, but also in database replicas, caches, queues, streaming platforms, data warehouses, backups, and so on (you’ll learn more about data systems in Part 9). As a result, stored data offers many possible points of attack, and a single vulnerability in any one of those copies can lead to a data breach.
- Long time frames, little monitoring
-
The data you store, and all of its copies, can sit around on those various hard drives for years (data is rarely, if ever, deleted), often to the extent where no one at the company even remembers the data is there. As a result, attackers have a long timeframe during which they can search for vulnerabilities, with relatively little risk of being noticed.
Many data breaches are not from brilliant algorithmic hacks of the primary, live database, but just some hacker stumbling upon an old copy of the data in a tertiary, poorly-protected data system—and these breaches often go undetected for years. This is why you need to have many layers of defense for the data you store. One layer is to pick a secure hosting option that prevents unauthorized individuals from getting physical access to your servers (as you saw in Part 1). Another layer is to set up a secure networking configuration that prevents unauthorized individuals from getting network access to your servers (as you saw in Part 7). But if both of these fail, the final layer of protection is to encrypt your data at rest, so even if an unauthorized individual gets access, they still can’t read the data.
You can encrypt data at rest at a number of levels:
-
Full-disk encryption
-
Data store encryption
-
Application-level encryption
The next several sections will look at each of these, starting with full-disk encryption.
Full-disk encryption
Most modern operating systems support full-disk encryption, where all the data stored on the hard drive is encrypted (e.g., using AES), typically using an encryption key that is derived from your login password: e.g., macOS FileVault and Windows BitLocker (full list). There are also self-encrypting drives (SEDs) that support full-disk encryption directly in the hardware. Cloud providers also typically support full-disk encryption, but with the added option of using an encryption key from that cloud provider’s KMS: e.g., AWS EBS volumes can be encrypted with AWS KMS keys and Google Cloud Compute Volumes can be encrypted with Cloud KMS keys.
Full-disk encryption is a type of transparent data encryption (TDE), where once you’re logged into the computer, any data you read or write is automatically decrypted and encrypted, without you being aware this is happening. Therefore, full-disk encryption won’t help you if an attacker gets access to a live (authenticated) system, but it does protect against attackers who manage to steal a physical hard drive, as they won’t be able to read the data without the encryption key.
Data store encryption
Some data stores also support TDE, typically using an encryption key you provide when the data store is booting up, that they use to encrypt either the entire data store, or parts of the data store (e.g., one column in a database table): e.g., MySQL Enterprise Transparent Data Encryption (TDE) and pg_tde for PostgreSQL. Most cloud providers also support encryption for their managed data stores, using encryption keys from that cloud provider’s KMS: e.g., AWS RDS encryption uses AWS KMS keys and Azure SQL Database encryption uses Azure Key Vault keys.
Data store encryption provides a higher level of protection than full-disk encryption, as it’s the data store software, not the operating system, that is doing encryption. That means that you get protection not only against a malicious actor stealing a physical hard drive, but also against a malicious actor who manages to get access to the live (authenticated) operating system running the data store software, for any files the data store software writes to disk will be unreadable without the encryption key. The only thing data store encryption won’t protect against is a malicious actor who is able to authenticate to the data store software: e.g., if a malicious actor is able to compromise a database user account and run queries.
Application-level encryption
In addition to the various TDE options, you could also implement encryption in your application code, so that you encrypt your data before storing it in a data store or on disk. For example, when a user adds some new data in your application, you fetch an encryption key from a secret store, use AES with the encryption key to encrypt the data, and then store the resulting ciphertext in a database.
This approach has several advantages. First, it provides an even higher level of protection than data store encryption, protecting not only against a hard drive being stolen and file system access on live (authenticated) operating systems, but also against a malicious actor who can authenticate to your data store software. Even if an attacker can compromise a database user and run queries, they still won’t be able to read any of the data they get back unless they can also compromise the encryption key. Second, it provides granular control over the encryption, as you can use different encryption keys for different types of data (e.g., for different users, customers, tables, and so on). Third, it allows you to securely store data even in untrusted systems, or systems that aren’t as secure as they could be (e.g., systems that don’t support TDE).
This approach also has several drawbacks. First, it requires you to make nontrivial updates to your application code, whereas TDE requires no changes to your apps. Second, the data you store is now opaque to your data stores, which makes it more difficult to query. For example, you may not be able to run queries that look up data in specific columns or do full-text search if the data you’re storing is ciphertext.
Generally speaking, since the TDE options are transparent, and the performance impact is small for most use cases, it’s typically a good idea to enable full-disk encryption for all company computers and servers, and to enable data store encryption for all your data stores, by default. As for application-level encryption, that’s typically reserved only for use cases where the highest level of security is necessary, or no other types of encryption are supported.
|
Key takeaway #7
You can encrypt data at rest using full-disk encryption, data store encryption, and application-level encryption. |
Now that you have seen the various ways to store data securely, let’s move on to discussing how to transmit data securely, which is the topic of the next section.
Secure Communication
The second use case for cryptography that we’ll look at is transmitting data securely. That is, how do you send data over the network in a way that provides confidentiality, integrity, and authenticity? The answer once again is to use encryption, which is why secure communication is often referred to as encryption in transit. Encryption in transit usually relies on hybrid encryption, using asymmetric-key encryption to protect the initial communication and do a key exchange, and then using symmetric-key encryption for all messages after that. Some of the most common protocols for encryption in transit include:
- TLS
-
Best-known for securing web browsing (HTTPS), but also used in securing server-to-server communications, instant messaging, email, some types of VPN, and many other applications.
- SSH
-
Best-known for securing connections to remote terminals (as per Part 7).
- IPsec
-
Best-known for securing some types of VPN connections (as per Part 7).
A deep-dive into each of these protocols is beyond the scope of this blog post series, but it’s worth taking a closer look at TLS, as it’s something you’ll likely have to understand to be able to do software delivery no matter where you happen to work.
Transport Layer Security (TLS)
Every time you browse the web and go to an HTTPS URL, you are relying on Transport Layer Security (TLS) to keep your communication secure. TLS is the replacement for Secure Sockets Layer (SSL), which was the original protocol used to secure HTTPS, and you’ll still see the term SSL used in many places, but at this point, all versions of SSL have known security vulnerabilities and are deprecated, so you should only be using TLS. In particular, you should be using TLS versions 1.3 or 1.2; all older versions have known security vulnerabilities and are deprecated (though sometimes you may have to support older versions to maintain compatibility with older clients).
TLS is responsible for ensuring confidentiality, integrity, and authenticity, especially against man-in-the-middle (MITM) attacks, where a malicious actor may try to intercept your messages, read them, modify them, and impersonate either party in the exchange. To ensure confidentiality, TLS encrypts all messages with hybrid encryption, preventing malicious actors from reading those messages. To ensure integrity, TLS uses authenticated encryption, so every message includes a MAC, preventing malicious actors from modifying those messages. Moreover, every message includes a nonce, which is a number that is incremented for every message, preventing malicious actors from reordering or replaying messages (as then the nonce in the message wouldn’t match the value you’re expecting). To ensure authenticity, TLS uses asymmetric-key encryption; more on that shortly.
TLS is a client-server protocol. For example, the client might be your web browser, and the server might be one of the servers running google.com, or both client and server could be applications in your microservices architecture. The first phase of the protocol is the handshake, where the client and server do the following:
- Negotiation
-
The client and server negotiate which TLS version (e.g., 1.2, 1.3) and which cryptographic algorithms to use (e.g., RSA, AES). This typically works by the client sending over the TLS versions and algorithms it supports, and the server picking which ones to use from that list, so when configuring TLS on your servers, you’ll need to find a balance between only allowing the most modern versions and algorithms to maximize security versus allowing older versions and algorithms to support a wider range of clients.
- Authentication
-
To protect against MITM attacks, TLS supports authentication. When using TLS for web browsing, you typically only do one-sided authentication, with the web browser validating the server (but not the other way around); when using TLS for applications in a microservices architecture, ideally, you use mutual authentication (mTLS), where each side authenticates the other, as you saw in the service mesh example in Part 7. You’ll see how TLS authentication works shortly.
- Key exchange
-
The client and server use asymmetric-key encryption to securely exchange randomly-generated encryption keys. At this point, the second phase of the protocol starts, where everything is encrypted using symmetric-key encryption with the randomly-generated encryption keys.
One of the trickiest parts of the handshake phase is authentication. For example, how can your web browser be sure it’s really talking to google.com? Perhaps you are thinking you can use asymmetric-key encryption to solve this problem: e.g., Google signs a message with its private key, and your browser checks that message really came from Google by validating the signature with Google’s public key. This works, but how do you get Google’s public key in the first place? Perhaps you are thinking you can get it from their website, but what stops a malicious actor from doing a MITM attack, and swapping in their own public key instead of Google’s? Perhaps now you’re thinking you can use encryption, but then how do you authenticate that encryption? That just starts the cycle all over again.
TLS breaks out of this cycle by establishing a chain of trust. This chain starts by hard-coding data about a set of entities you know you can trust. These entities are called root certificate authorities (CAs), and the data you hard-code consists of their certificates, which are a combination of a public key, metadata (such as the domain name for a website and identifying information for the owner), and a digital signature. When you’re browsing the web, your browser and operating system come with a set of certificates for trusted root CAs built-in, including a number of organizations around the world, such as VeriSign, DigitCert, LetsEncrypt, Amazon, and Google; when you’re running apps in a microservices architecture, you typically run your own private root CA, and hard-code its details into your apps.
If you own a domain, you can get a TLS certificate for it from a CA by going through the process shown in Figure 74:
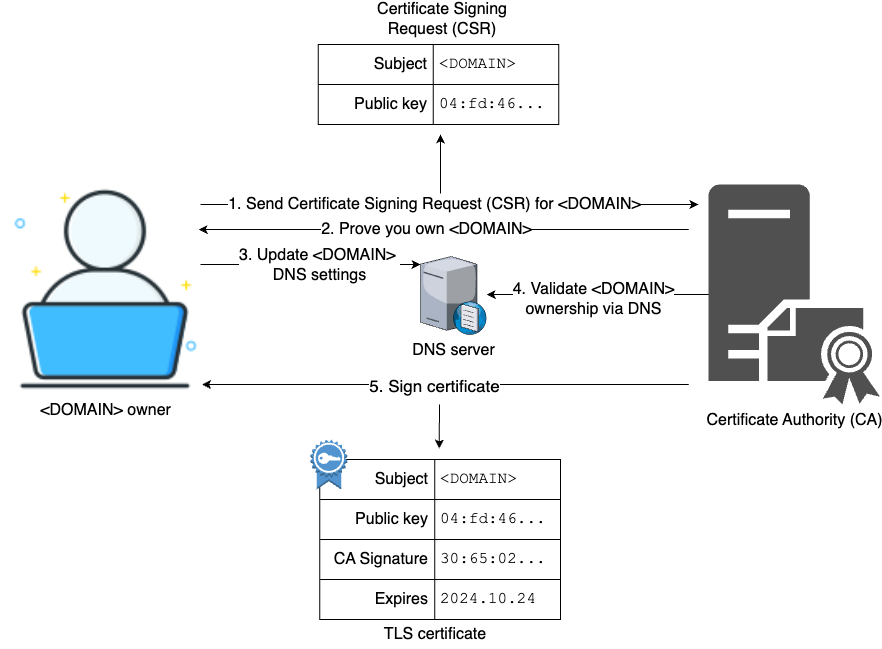
The steps in this process are:
-
You submit a certificate signing request (CSR) to the CA, specifying your domain name, identifying details about your organization (e.g., company name and contact details), your public key, and a signature (as proof you own the corresponding private key).
-
The CA will ask you to prove that you own the domain. Modern CAs use the Automatic Certificate Management Environment (ACME) protocol for this. For example, the CA may ask you to host a file with specific contents at a specific URL within your domain (e.g.,
your-domain.com/file.txt) or you may have to add a specific DNS record to your domain with specific contents (e.g, aTXTrecord atyour-domain.com). -
You update your domain with the requested proof.
-
The CA checks your proof.
-
If the CA accepts your proof, it will send you back a certificate with the data from your CSR, plus the signature of the CA. This signature is how the CA extends the chain of trust. It’s effectively saying, "if you trust me as a root CA, then you can trust that the public key in this certificate is valid for this domain."
Note that most TLS certificates have an expiration date, so you’ll have to repeat this process periodically to renew your certificate. Once you have a TLS certificate, Figure 75 shows how this certificate gets used:
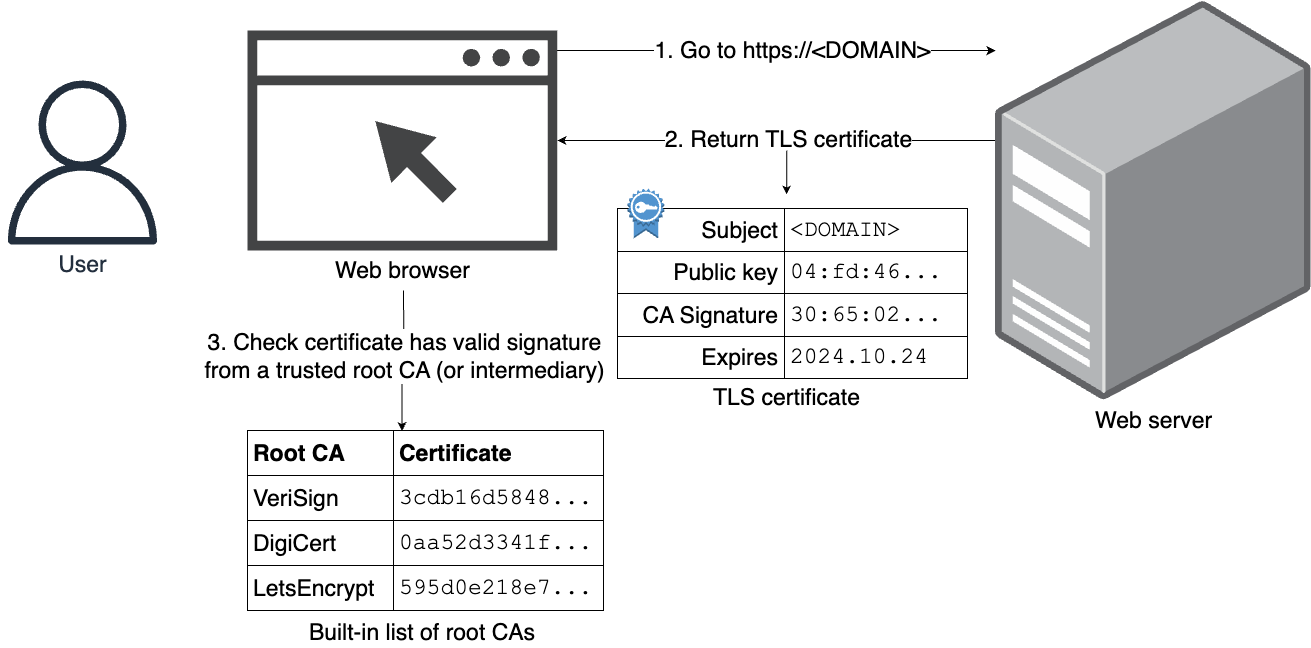
The steps in this process are:
-
You visit some website in your browser at
https://<DOMAIN>;. -
During the TLS handshake, the web server sends over its TLS certificate, which includes the web server’s public key and a CA’s signature. The web server also signs the message with its private key.
-
Your browser validates the TLS certificate is for the domain
<DOMAIN>and that it was signed by one of the root CAs you trust (using the public key of that CA). The browser also validates that the web server actually owns the public key in the certificate by checking the signature on the message. If both checks pass, you can be confident that you’re really talking to<DOMAIN>, and not someone doing a MITM attack, as a malicious actor has no way to get a root CA to sign a certificate for a domain they don’t own, and they can’t modify even one bit in the real certificate without invalidating the signatures.
Note that some root CAs don’t sign website certificates directly, but instead, they sign certificates for one or more levels of intermediate CAs (extending the chain of trust), and it’s actually one of those intermediate CAs that ultimately signs the certificate for a website. In that case, the website returns the full certificate chain, and as long as that chain ultimately starts with a root CA you trust, and each signature along the way is valid, you can then trust the entire thing.
|
Key takeaway #8
You can encrypt data in transit using TLS. You get a TLS certificate from a certificate authority. |
The system of CAs is typically referred to as public key infrastructure (PKI). There are two primary types of PKIs that you will come across:
- Web PKI
-
Your web browser and most libraries that support HTTPS know how to use the web PKI to authenticate HTTPS URLs for the public Internet. To get a TLS certificate for the web, you have a number of options (full list). One option is to use a free CA such as LetsEncrypt or ZeroSSL, which have appeared in recent years as part of an effort to make the web more secure. Another option is to use a cloud provider managed service, such as AWS Certificate Manager (ACM) or Google-managed SSL certificates, which have the advantage of being free, auto-renewing, and secure (you never even get access to the private key, so you can’t compromise it), but also have the drawback that you can only use those certificates with that cloud provider’s managed services (e.g., their load balancers). One final option is to buy TLS certificates from one of the traditional CAs and domain name registrars, such as DigiCert or GoDaddy. These used to be the only game in town, but these days, they are mainly useful for use cases not supported by the free CAs: e.g., if you need a specific type of wildcard certificate, or you have specific renewal and verification requirements.
- Private PKI
-
For apps in a microservices architecture, you typically run your own private PKI. One of the benefits of a service mesh is that it handles the PKI for you, as you saw in Part 7. If you’re not using a service mesh, there are a number of other options (full list). Oone option is to set up a private PKI using self-hosted tools such as HashiCorp Vault / OpenBAO, step-ca, or cfssl; another option is to use a managed private PKI from a cloud provider, such as AWS Private CA or Google CA Service; a third option is to use a managed private PKI from a cloud-agnostic vendor, such as Keyfactor or Entrust.
Now that you understand how TLS works, let’s try out an example.
Example: HTTPS with LetsEncrypt and AWS Secrets Manager
In this section, you’re going to get hands-on practice with two concepts you’ve seen in this blog post: provisioning TLS certificates and storing infrastructure secrets. You’ll also see how to actually use a TLS certificate with a web server to serve a website over HTTPS. Here are the steps you’ll go through:
-
Get a TLS certificate from LetsEncrypt
-
Store the TLS certificate in AWS Secrets Manager
-
Deploy EC2 instances that use the TLS certificate
Let’s start with getting a TLS certificate from LetsEncrypt.
Get a TLS certificate from LetsEncrypt
In this example, you’ll see how to get a TLS certificate from LetsEncrypt, one of the first companies to offer free TLS certificates, and nowadays, one of the largest CAs in the world, used by more than 300 million websites. You can get TLS certificates from LetsEncrypt using a tool called Certbot. The idiomatic way to use Certbot is to connect to a live webserver (e.g., using SSH), run Certbot directly on that server, and Certbot will automatically request the TLS certificate, validate domain ownership, and install the TLS certificate for you. This approach is great for manually-managed websites with a single user-facing server, but it’s not as good of a fit for automated deployments with multiple servers that could be replaced at any time. Therefore, in this section, you’re instead going to use Certbot in "manual" mode to get a certificate onto your own computer, and in the next section, you’ll store that certificate in AWS Secrets Manager.
Install Certbot on your own computer (minimum version 2.11).
For example, an easy way to install Certbot on macOS is to run brew install certbot. Next, create a temporary folder
to store the TLS certificate:
$ mkdir -p /tmp/certs

$ cd /tmp/certs
You’ll initially have the certificate on your hard drive (a secret in plaintext on disk!), but after storing it in AWS
Secrets Manager, you will delete the local copy (and if you forget, /tmp is automatically deleted on reboot on many
systems).
In Part 7, you registered a domain name using AWS Route 53. Request a TLS certificate for that same domain name as follows:
$ certbot certonly --manual \    (1)

    --config-dir . \             (2)

    --work-dir . \

    --logs-dir . \

    --domain www.<YOUR-DOMAIN> \ (3)

    --cert-name example \        (4)

    --preferred-challenges=dns   (5)
Here’s what this command does:
| 1 | Run Certbot in manual mode, where it’ll solely request a certificate and store it locally, without trying to install it on a web server for you. |
| 2 | Configure Certbot to use the current directory, which should be the temporary folder you just created, to store the certificate and other files it generates. |
| 3 | Fill in your domain name here. |
| 4 | Configure Certbot to use "example" as the name of the subfolder where it will store the certificate (this has no impact on the contents of the certificate itself). |
| 5 | Configure Certbot to use DNS as the way to validate that you own the domain in (3). You’ll have to prove that you own this domain, as explained next. |
When you run the preceding command, Certbot will prompt you for a few pieces of information, including your email address, whether you accept their terms of service, and so. After that, Certbot will show you instructions on how to prove that you own the domain name you specified, and it’ll pause execution to give you time to do this:
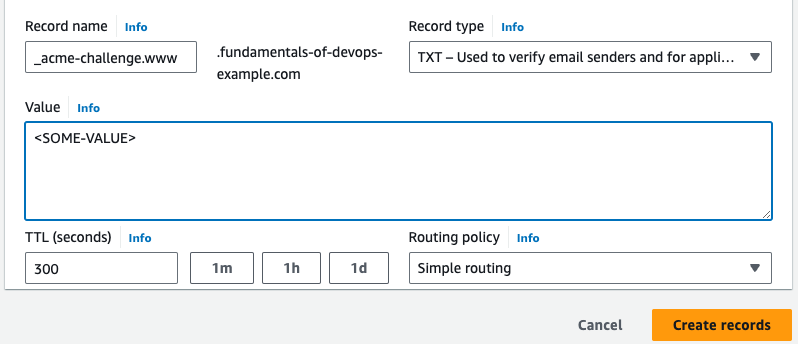
Please deploy a DNS TXT record under the name: _acme-challenge.www.<YOUR-DOMAIN>

with the following value: <SOME-VALUE>
To prove that you own your domain name, you need to create a DNS TXT record with the randomly-generated value
<SOME-VALUE>. Head to the Route 53 hosted zones page, click
on the hosted zone for your domain, and click the "Create record" button. On the next page, fill in
_acme-challenge.www as the name of the record, select TXT as the type, enter the randomly-generated
<SOME-VALUE> as the value, and click "Create records," as shown in Figure 76:
After you create the record, give the changes a minute or two to propagate, and then head back to your terminal, and hit ENTER to let Certbot know the DNS record is ready. LetsEncrypt will validate your DNS record, and if everything worked, it’ll issue you a TLS certificate, showing you a message similar to the following:
Successfully received certificate.

Certificate is saved at: /tmp/certs/live/example/fullchain.pem

Key is saved at:         /tmp/certs/live/example/privkey.pem
Congrats, you just got a TLS certificate signed by a CA! The certificate itself is in live/example/fullchain.pem and the private key is in live/example/privkey.pem. Feel free to take a look at the contents of these two files. One way to do that is to use OpenSSL:
$ openssl x509 -noout -text -in /tmp/certs/live/example/fullchain.pem

Certificate:

    Data:

        Issuer: C=US, O=Let's Encrypt, CN=E6

        Validity

            Not After : Nov 18 14:24:35 2024 GMT

        Subject: CN=www.fundamentals-of-devops-example.com

    Signature Value:

        30:65:02:31:00:a3:25:e2:18:8e:06:80:5f:9c:05:df:f0:4e:

(... truncated ...)
This will spit out a bunch of information about your certificate, such as the issuer (LetsEncrypt), the domain name it’s for (under "Subject"), the expiration date (under "Validity"), and the signature. When you’re done poking around, feel free to delete the TXT record from your Route 53 hosted zone, as that record is only needed during the verification process.
Note that the private key of a TLS certificate is an infrastructure secret, so you need to store it in encrypted format, ideally in a secret store, as discussed in the next section.
Store the TLS certificate in AWS Secrets Manager
AWS Secrets Manager is a general-purpose secret store that provides a way to store secrets in encrypted format, access secrets via API, CLI, or a web UI, and control access to secrets via IAM. Under the hood, the secrets are encrypted using AES and envelope encryption, with a root key stored in AWS KMS.
|
Watch out for snakes: AWS Secrets Manager is not part of the AWS free tier!
While most of the examples in this blog post series are part of the AWS free tier, Amazon Secrets Manager is not. It does offer a 30-day free trial, so you can try these examples at no cost, but each secret you store after the trial ends will cost you $0.40 per month (prorated). |
The typical way to store secrets in AWS Secrets Manager is to format them as JSON. Let’s format the TLS certificate as JSON that looks like Example 137:
{"cert": "<CERTIFICATE>", "key": "<PRIVATE-KEY>"}One way to create this JSON format is to use jq, which will also take care of converting
special characters for you (e.g., converting new lines to \n):
$ CERTS_JSON=$(jq -n -c -r \

  --arg cert "$(cat live/example/fullchain.pem)" \

  --arg key "$(cat live/example/privkey.pem)" \

  '{cert:$cert,key:$key}')
This creates a variable called CERTS_JSON that contains the certificate and private key in JSON format. Use
the AWS CLI to store this JSON in AWS Secrets Manager:
$ aws secretsmanager create-secret \

  --region us-east-2 \

  --name certificate \

  --secret-string "$CERTS_JSON"
This creates a secret with id "certificate" in AWS Secrets Manager. If you head over to the
AWS Secrets Manager console, you should
see the secret called "certificate" in the list. Click on it, and on the next page, click "Retrieve secret value," and
check that the cert and key values show up correctly, as shown in Figure 77:
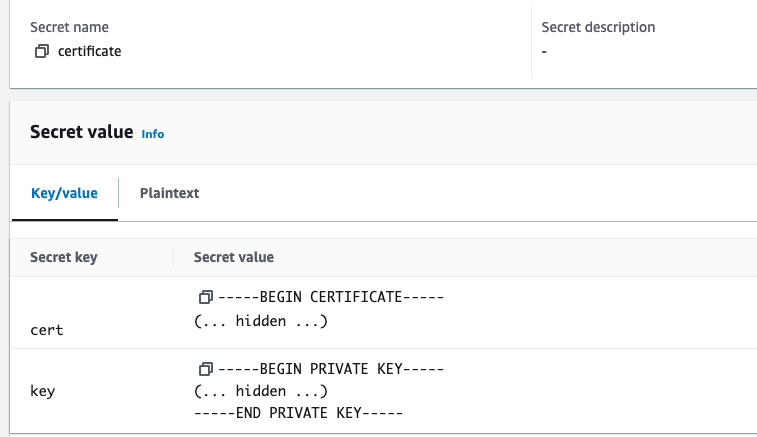
If everything looks OK, delete the TLS certificate from your hard drive:
$ certbot delete \

  --config-dir . \

  --work-dir . \

  --logs-dir .
Let’s now move on to deploying servers that use these TLS certificates.
Deploy EC2 instances that use the TLS certificate
|
Example Code
As a reminder, you can find all the code examples in the blog post series’s sample code repo in GitHub. |
In Part 7, you deployed several EC2 instances that responded with "Hello, World!" to HTTP requests on port 8080, and you configured a domain name for those instances in Route 53. Let’s extend that example to listen for HTTPS requests on port 443 (the default port for HTTPS), using the TLS certificate in AWS Secrets Manager. Head into the folder you’ve been using for this blog post series’s examples, and create a new subfolder for this blog post:
$ cd fundamentals-of-devops

$ mkdir -p ch8/tofu/live
Next, copy over your code from Part 7 into a new folder called ec2-dns-tls:
$ cp -r ch7/tofu/live/ec2-dns ch8/tofu/live/ec2-dns-tlsIn ec2-dns-tls/main.tf, make the changes shown in Example 138:
module "instances" {

  source  = "brikis98/devops/book//modules/ec2-instances"

  version = "1.0.0"


  name          = "ec2-dns-example"

  num_instances = 3

  instance_type = "t2.micro"

  ami_name      = "sample-app-tls-packer-*" (1)

  http_port     = 443                       (2)

  user_data     = file("${path.module}/user-data.sh")

}
The preceding code has two changes:
| 1 | Use the name "sample-app-tls-packer" for the AMI. You’ll see why you need to update the Packer template to use this new name shortly. |
| 2 | Switch the port from 8080 to 443. |
Also in main.tf, add the code shown in Example 139 to allow the EC2 instances to read the TLS certificate data from AWS Secrets Manager:
(1)

resource "aws_iam_role_policy" "tls_cert_access" {

  role   = module.instances.iam_role_name

  policy = data.aws_iam_policy_document.tls_cert_access.json

}


(2)

data "aws_secretsmanager_secret" "certificate" {

  name = "certificate"

}


(3)

data "aws_iam_policy_document" "tls_cert_access" {

  statement {

    effect    = "Allow"

    actions   = ["secretsmanager:GetSecretValue"]

    resources = [data.aws_secretsmanager_secret.certificate.arn]

  }

}
This code does the following:
| 1 | Attach a new IAM policy to the IAM role of the EC2 instances. The policy itself is defined in (3). |
| 2 | Look up the secret named "certificate" in AWS Secrets Manager. |
| 3 | Define an IAM policy that allows the EC2 instances to read the certificate in (2) from AWS Secrets Manager. |
Now it’s time to update the app itself to use the TLS certificate. Copy the Packer template you created in Part 3:
$ cp -r ch3/packer ch8/packerIn order to fetch the TLS certificate from AWS Secrets Manager, the app will need to use the AWS SDK for Node.js. To install the SDK, first, add a minimal package.json file in packer/sample-app, as shown in Example 140:
{

  "name": "sample-app-packer",

  "version": "0.0.1",

  "description": "Sample app for 'Fundamentals of DevOps and Software Delivery'",

  "author": "Yevgeniy Brikman",

}
Next, run npm install to add the AWS Secrets Manager library from the AWS SDK:
$ cd ch8/packer/sample-app

$ npm install --save @aws-sdk/client-secrets-manager
Update the sample app code in app.js to use this library as shown in Example 141:
const https = require('https');                                             (1)


const secretsMgr = require('@aws-sdk/client-secrets-manager');

const client = new secretsMgr.SecretsManagerClient({region: 'us-east-2'});


(async () => {                                                              (2)

  const response = await client.send(new secretsMgr.GetSecretValueCommand({ (3)

    SecretId: 'certificate'

  }));


  const options = JSON.parse(response.SecretString);                        (4)


  const server = https.createServer(options, (req, res) => {                (5)

    res.writeHead(200, { 'Content-Type': 'text/plain' });

    res.end('Hello, World!\n');                                             (6)

  });


  const port = process.env.PORT || 443;                                     (7)

  server.listen(port,() => {

    console.log(`Listening on port ${port}`);

  });

})();
Here are the changes to make to the sample app:
| 1 | Instead of using the http Node.js library, use the https library. |
| 2 | In order to fetch the TLS certificate from AWS Secrets Manager, you’re going to have to make an API call, which
in Node.js means you’ll be using asynchronous I/O. I like using await to deal with this sort of I/O, but you
can only use await inside of a function marked async, so wrap the rest of the code in an async function that
immediately runs itself. |
| 3 | Use the AWS Secrets Manager library to fetch the TLS certificate. |
| 4 | Parse the data from (3) as JSON. |
| 5 | Use the https library to run an HTTPS server, and pass it the JSON from (4) as configuration. The Node.js
https library looks for TLS certificates under the cert and key fields in its configuration; not
coincidentally, these are the exact field names you used when storing the TLS certificate in AWS Secrets Manager. |
| 6 | If you had updated the app to respond with "Fundamentals of DevOps!" back in Part 3, switch the response back to "Hello, World!" |
| 7 | Listen on port 443 rather than port 8080. You’ll see how to allow the app to do this next. |
Update install-node.sh as shown in Example 142:
sudo setcap 'cap_net_bind_service=+ep' "$(readlink -f "$(which node)")" (1)


sudo adduser app-user

sudo mv /tmp/sample-app /home/app-user

sudo npm ci --only=production --prefix /home/app-user/sample-app        (2)

sudo chown -R app-user /home/app-user/sample-app

sudo npm install pm2@latest -g

eval "$(sudo -u app-user pm2 startup -u app-user | tail -n1)"
You need to make two changes to the script:
| 1 | In the past, apps could only listen on port 443, or any port less than 1024, with root user permissions. Nowadays,
you can use the Linux capabilities system to grant apps fine-grained permissions, such as binding to low-numbered
ports. The preceding code uses the setcap utility to grant the node binary permissions to bind on low-numbered
ports. Normally, you’d only use this functionality for locked-down load balancers (e.g., Nginx), but for learning
and testing, it’s OK to grant these permissions directly to your app. |
| 2 | Since the sample-app now has dependencies, you need to run npm ci to install them. |
Finally, update the Packer template in sample-app.pkr.hcl as shown in Example 143:
source "amazon-ebs" "amazon-linux" {

  ami_name        = "sample-app-tls-packer-${uuidv4()}" (1)

  ami_description = "Amazon Linux AMI with a TLS Node.js sample app."

  instance_type   = "t2.micro"

  region          = "us-east-2"

  source_ami      = data.amazon-ami.amazon-linux.id

  ssh_username    = "ec2-user"

}
There’s just one change to make:
| 1 | The sample app now only works with TLS, whereas all the examples you did in earlier blog posts weren’t configured for TLS, so the preceding code updates the Packer template with a new name, ensuring non-TLS examples don’t accidentally pick up the TLS AMI, and vice versa. |
Build a new AMI by authenticating to AWS and running Packer:
$ cd ../

$ packer init sample-app.pkr.hcl

$ packer build sample-app.pkr.hcl
Once the new AMI has built, deploy as usual:
$ cd ../tofu/live/ec2-dns-tls

$ tofu init

$ tofu apply
When apply completes, give the servers a minute or two to boot up, and then test https://www.<DOMAIN_NAME>;:
$ curl https://www.<DOMAIN_NAME>

Hello, World!
If you see the familiar "Hello, World!" text, congrats, you’re now encrypting data in transit using TLS, and you’re encrypting data at rest using AWS Secrets Manager!
|
Get your hands dirty
Here are a few exercises you can try at home to go deeper:
|
When you’re done experimenting, commit your changes to Git, and undeploy this example by running tofu destroy. You
may also wish to mark the "certificate" secret for deletion in AWS Secrets Manager (so you don’t get charged
after the trial period).
Now that you’ve seen how to transmit data securely over TLS, the last thing to discuss is how to enforce encryption everywhere, which is the topic of the next section.
End-to-End Encryption
The web servers you deployed in the previous section are representative of servers that you expose directly to the public Internet (in a DMZ), such as load balancers. In fact, the approach many companies have used for years is to solely encrypt connections from the outside world to the load balancers, which is sometimes referred to as terminating the TLS connection. All the other connections within the data center, such as connections between microservices, were left unencrypted, as shown in Figure 78:
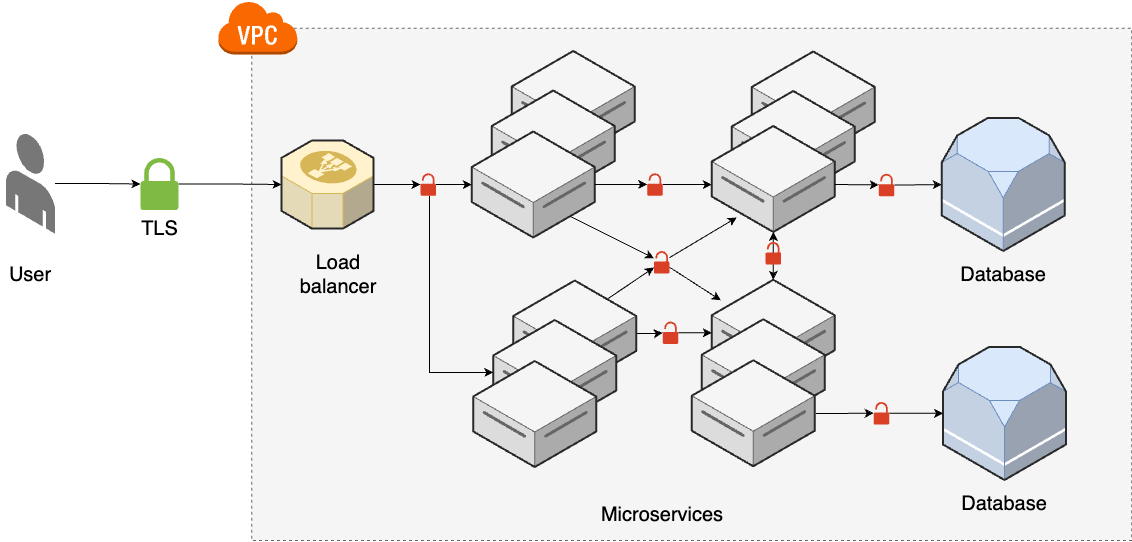
You may recognize this as the castle-and-moat networking approach from Part 7, and it has all the same security drawbacks. As companies move more towards the zero-trust architecture approach, they instead require that all network connections are encrypted, as shown in Figure 79:
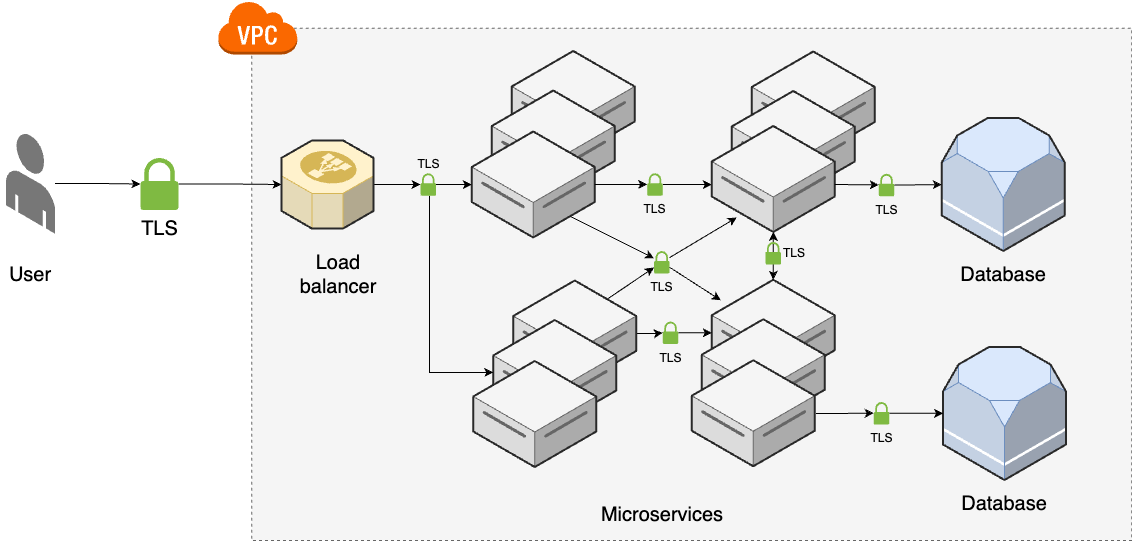
At this point, you’re enforcing encryption in transit everywhere. The next logical step is to enforce encryption at rest everywhere, too, as shown in Figure 80:

Encrypting all data at rest and in transit used to be known as end-to-end (E2E) encryption. Assuming you do a good job of protecting the underlying encryption keys, this ensures that all of your customer data is protected at all times, and there is no way for a malicious actor to get access to it. But it turns out there is one more malicious actor to consider: you. That is, your company, and all of its employees. The modern definition of end-to-end encryption that applies in some cases is that not even the company providing the software should be able to access customer data. For example, this definition of E2E encryption is important in messaging apps, where you typically don’t want the company providing the messaging software to be able to read any of the messages; it’s also important in password managers, as you heard earlier in this blog post, where you don’t want the company providing the password manager software to be able to read any of your passwords.
With this definition of E2E encryption, the only people who should be able to access the data are the customers that own it. That means the data needs to be encrypted client-side, before it leaves the user’s device, as shown in Figure 81:
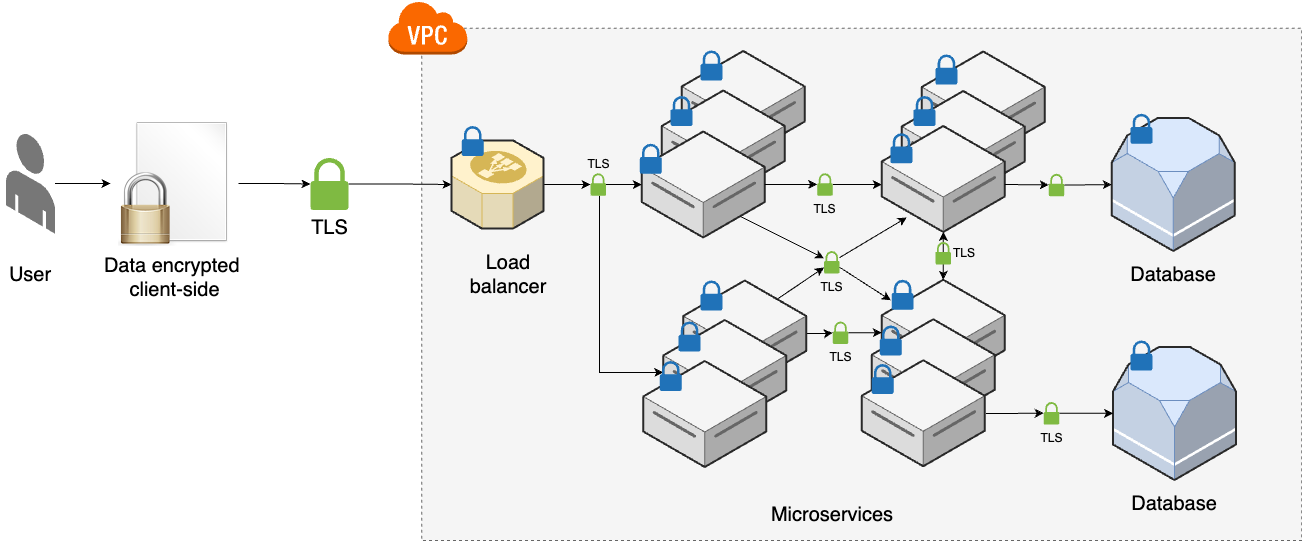
|
Key takeaway #9
Use end-to-end encryption to protect data so that no one other than the intended recipients can see it—not even the software provider. |
From a privacy and security perspective, E2E encryption is great. However, before you buy the hype, and sign up for the latest E2E encryption messaging app, or try to build your own E2E-encrypted software, there are some questions you should ask:
-
What encryption key do you use for E2E encryption?
-
What data needs to be E2E encrypted and what doesn’t?
-
How do you establish trust with E2E-encrypted software?
Let’s look at these one at a time, starting with what encryption keys to use.
What encryption key do you use for E2E encryption?
This is perhaps the easiest of the three questions to answer: most E2E-encrypted software uses envelope encryption. The root key is typically derived from whatever authentication method you use to access the software: e.g., the password you use to log in to the app. This root key is used to decrypt one or more data keys, which are stored in encrypted format, either on the user’s device, or in the software provider’s servers. Once the data key is decrypted, the software typically keeps it in memory, and uses it to encrypt and decrypt data client-side.
For some types of software, the data keys are encryption keys used with symmetric-key encryption: e.g., an E2E-encrypted password manager may use AES to encrypt and decrypt your passwords. For other types of software, the data keys may be private keys for asymmetric-key encryption: e.g., an E2E-encrypted messaging app may give each user a private key that is stored on the device and used to decrypt messages, and a public key that can be shared with other users to encrypt messages.
What data needs to be E2E encrypted and what doesn’t?
This is a slightly trickier question, as not all data can be encrypted client-side. There is always some minimal set of data that must be visible to the software vendor, or the software won’t be able to function at all. For example, in an E2E-encrypted messaging app, at a minimum, the software vendor must be able to see the recipients of every message so that the message can be delivered to those recipients.
Beyond this minimum set of data, each software vendor has to walk a fine line. On the one hand, the more data you encrypt client-side, the more you protect your user’s privacy. On the other hand, encrypting more client-side comes at the cost of limiting the functionality you can provide server-side. Whether these limitations are good or bad is a question of what you value. For example, the more you encrypt client-side, the harder it is to do server-side search and ad targeting. Is it good or bad that an ad-supported search business like Google could not exist in an E2E-encrypted world?
How do you establish trust with E2E-encrypted software?
This is the trickiest question of all. How do you know you can trust software that claims to be E2E encrypted? Consider all the ways this trust could be broken:
- The software vendor could be lying
-
A number of companies that claimed their software offered E2E encryption were later found out to be lying or exaggerating. For example, according to the FTC, Zoom claimed that they provided E2E encryption for user communications, whereas in reality, "Zoom maintained the cryptographic keys that could allow Zoom to access the content of its customers’ meetings."
- The software vendor could have backdoors
-
Sometimes, a vendor genuinely tries to provide E2E encryption, but a government agency forces the vendor to install backdoors (hidden methods to access the data). For example, the documents Edward Snowden leaked to The Guardian showed that Microsoft provided the NSA with backdoors into Skype and Outlook, despite claiming those systems used E2E encryption.
- The software could have bugs
-
Even if the vendor isn’t intentionally lying or building in backdoors, the software could still be buggy, and provide unintentional ways to bypass E2E encryption.
- The software (or hardware!) could be compromised
-
Even if the software has no bugs, how do you know the software hasn’t been compromised by an attacker? For example, if you downloaded the software from a website, how do you know some hacker didn’t intercept the download and swap in a compromised version of the software? If your answer is that the website used TLS, then how do you know you can trust the TLS certificate? If your answer is that you can rely on the signatures of root CAs, how do you know you can trust the list of root CAs hard-coded into your operating system or web browser? What if those were compromised? Or what if other software on your computer was compromised? Or even the hardware?
There’s no perfect solution to the last problem. In fact, this problem isn’t even unique to E2E-encrypted software, or software at all. Fundamentally, this is a question of how you establish trust, and it’s something humans have been grappling with for our entire existence. Technology can help, but it’s not the full solution. At some point, you need to make a judgment call to trust something, or someone, and build from there.
Conclusion
You’ve now seen how to secure storage and communication, as per the 9 key takeaways from this blog post:
-
Don’t roll your own cryptography. Always use mature, battle-tested, proven algorithms and implementations.
-
Do not store secrets as plaintext.
-
Avoid storing secrets whenever possible by using SSO, 3rd party services, or just not storing the data at all.
-
Protect personal secrets, such as passwords and credit card numbers, by storing them in a password manager.
-
Protect infrastructure secrets, such as database passwords and TLS certificates, by using a KMS and/or a general-purpose secret store.
-
Never store user passwords (encrypted or otherwise). Instead, use a password hash function to compute a hash of each password with a salt and pepper, and store those hash values.
-
You can encrypt data at rest using full-disk encryption, data store encryption, and application-level encryption.
-
You can encrypt data in transit using TLS. You get a TLS certificate from a certificate authority.
-
Use end-to-end encryption to protect data so that no one other than the intended recipients can see it—not even the software provider.
As you read through this blog post, you came across a large number of cryptographic techniques and tools. Table 17 summarizes all of this information in "cheat sheet" organized by use case. Next time you need to figure out the right approach to use to secure storage or communication, have a scan through this table:
| Use case | Solution | Example tools |
|---|---|---|
Store personal secrets |
Use a password manager |
1Password, Bitwarden |
Store infrastructure secrets |
Use a secret store or KMS |
OpenBao, AWS Secrets Manager |
Store customer passwords |
Store the hash of (password + salt + pepper) |
Argon2id, scrypt, bcrypt |
Encrypt data at rest |
Use authenticated encryption |
AES-GCM, ChaCha20-Poly1305 |
Encrypt data in transit on the Internet |
Use TLS with a certificate from a public CA |
LetsEncrypt, ACM |
Encrypt data in transit in a private network |
Use TLS with a certificate from a private CA |
Istio, step-ca |
Validate data integrity |
Use a cryptographic hash function |
SHA-2, SHA-3 |
Validate data integrity and authenticity |
Use a MAC |
HMAC, KMAC |
Much of this blog post focused on storing data securely. Let’s now move on to Part 9, where you’ll learn more about data storage, including how to use SQL, NoSQL, queues, warehouses, and file stores.
Update, June 25, 2024: This blog post series is now also available as a book called Fundamentals of DevOps and Software Delivery: A hands-on guide to deploying and managing software in production, published by O’Reilly Media!
